一步步自定义下拉刷新上拉加载——自定义简单的刷新组件

上一篇文章介绍了 事件分发机制 和 滑动冲突的解决方案,本篇文章开启自定义下拉刷新之旅。首先,我们看效果图。


在自定义下拉刷新时,我们通过使用Scroller 来滑动布局。接下来,我们先了解Scroller的使用。

Scroller

这篇文章郭霖 完全解析Scroller,详细地介绍了Scroller。
使用Scroller的步骤非常简单:

  1. 创建Scroller的实例
  2. 调用startScroll()方法来初始化滚动数据并刷新界面
  3. 重写computeScroll()方法,并在其内部完成平滑滚动的逻辑

同时我们要注意到ScrollTo 表示滚动到指定位置,ScrollBy表示每次滚动一段距离。

我们自定义一个ScrollerLayout来模拟ViewPager的滑动切换效果。
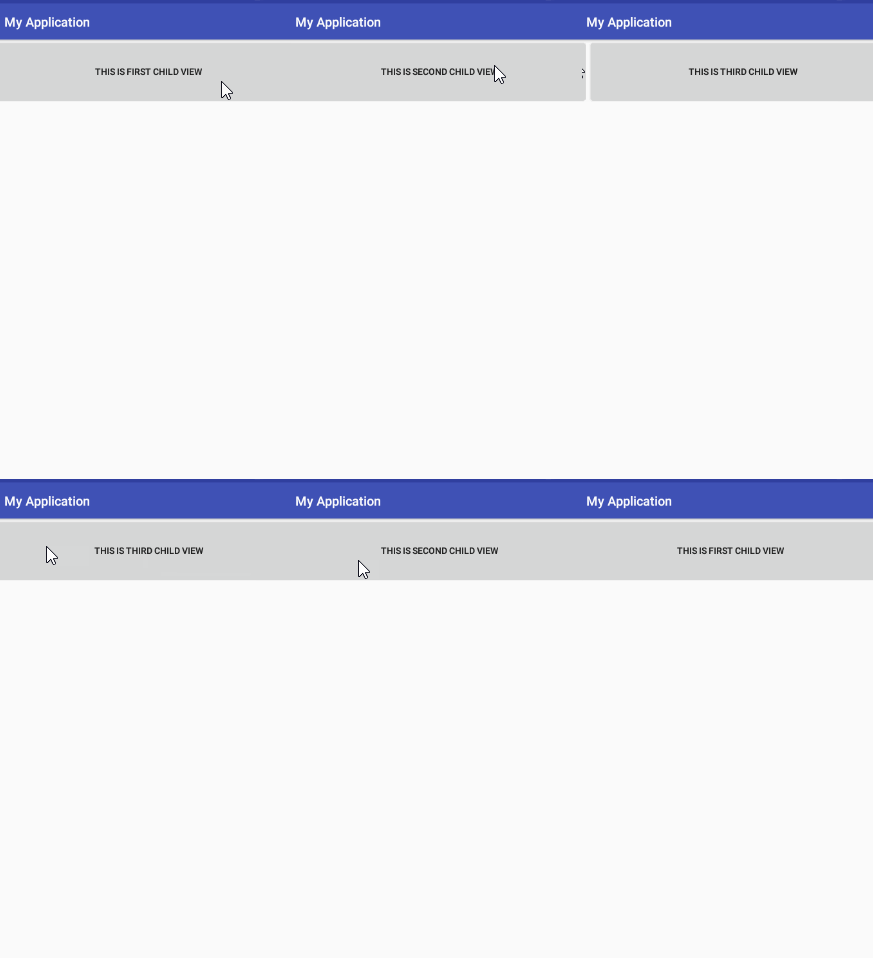
布局如下,在ScrollerLayout中嵌套了三个Button

1
2
3
4
5
6
7
8
9
10
11
12
13
14
15
16
17
18
19
20
<?xml version="1.0" encoding="utf-8"?>
<com.example.com.myapplication.view.ScrollerLayout xmlns:android="http://schemas.android.com/apk/res/android"
android:layout_width="match_parent"
android:layout_height="match_parent">

<Button
android:layout_width="match_parent"
android:layout_height="100dp"
android:text="This is first child view" />

<Button
android:layout_width="match_parent"
android:layout_height="100dp"
android:text="This is second child view" />

<Button
android:layout_width="match_parent"
android:layout_height="100dp"
android:text="This is third child view" />
</com.example.com.myapplication.view.ScrollerLayout>

由于Button是可点击的,它会消费点击事件,导致ScrollerLayout 不能调用OnTouchEvent。根据上篇文章介绍的 事件拦截机制和滑动冲突解决方案,我们必须在自定义ScrollerLayout添加拦截事件,即在ScrollerLayout滑动时进行拦截

1
2
3
4
5
6
7
8
9
10
11
12
13
14
15
16
17
18
@Override
public boolean onInterceptTouchEvent(MotionEvent ev) {
int x = (int) ev.getRawX();
switch (ev.getAction()) {
case MotionEvent.ACTION_DOWN:
mLastX = x;
break;
case MotionEvent.ACTION_MOVE:
int deltaX = x - mLastX;//拦截横向滑动事件
if (Math.abs(deltaX) > mTouchSlop) {
return true;
}
break;
case MotionEvent.ACTION_UP:
break;
}
return false;
}

左边界

当我们处于第一个界面,向右滑动

很明显
scrolledX = LastX - X < 0
getScroller()+ScrolledX < 0 <LeftBorder
此时我们让界面滑动到左边距

1
2
3
4
if (getScrollX() + scrolledX < mLeftBorder) { //左边界
scrollTo(mLeftBorder, 0);
return true;
}

右边界

当我们处于最后一个界面,向左滑动

scrolledX = LastX - X > 0

我们要控制
getScroller + scrolledX + getWidth > rightBorder

1
2
3
4
if (getScrollX() + getWidth() + scrolledX > mRightBorder) {// 右边界
scrollTo(mRightBorder - getWidth(), 0);
return true;
}

完整代码

1
2
3
4
5
6
7
8
9
10
11
12
13
14
15
16
17
18
19
20
21
22
23
24
25
26
27
28
29
30
31
32
33
34
35
36
37
38
39
40
41
42
43
44
45
46
47
48
49
50
51
52
53
54
55
56
57
58
59
60
61
62
63
64
65
66
67
68
69
70
71
72
73
74
75
76
77
78
79
80
81
82
83
84
85
86
87
88
89
90
91
92
93
94
95
96
97
98
public class ScrollerLayout extends ViewGroup {
private static String TAG = "ScrollerLayout";

private Scroller mScroller;
private int mTouchSlop;//最小的滑动距离

private int mLeftBorder;
private int mRightBorder;

public ScrollerLayout(Context context, AttributeSet attrs) {
super(context, attrs);
mScroller = new Scroller(context);
mTouchSlop = ViewConfiguration.get(context).getScaledTouchSlop();
Log.d(TAG, "最小滑动距离: TouchSlop " + mTouchSlop);
}

@Override
protected void onMeasure(int widthMeasureSpec, int heightMeasureSpec) {
super.onMeasure(widthMeasureSpec, heightMeasureSpec);
int childCount = getChildCount();
for (int i = 0; i < childCount; i++) {
View child = getChildAt(i);
measureChild(child, widthMeasureSpec, heightMeasureSpec);//测量子View
}
}

@Override
protected void onLayout(boolean changed, int l, int t, int r, int b) {
if (changed) {
int childCount = getChildCount();
for (int i = 0; i < childCount; i++) {
View child = getChildAt(i);
child.layout(i * child.getMeasuredWidth(), 0, (i + 1) * child.getMeasuredWidth(), child.getMeasuredHeight());
}
//初始化左右边界的值
mLeftBorder = getChildAt(0).getLeft();
mRightBorder = getChildAt(childCount - 1).getRight();
}
}

private int mLastX;

@Override
public boolean onInterceptTouchEvent(MotionEvent ev) {
int x = (int) ev.getRawX();
switch (ev.getAction()) {
case MotionEvent.ACTION_DOWN:
mLastX = x;
break;
case MotionEvent.ACTION_MOVE:
int deltaX = x - mLastX;//拦截横向滑动事件
if (Math.abs(deltaX) > mTouchSlop) {
return true;
}
break;
case MotionEvent.ACTION_UP:
break;
}
return false;
}

@Override
public boolean onTouchEvent(MotionEvent event) {
int x = (int) event.getRawX();
switch (event.getAction()) {

case MotionEvent.ACTION_MOVE:
int scrolledX = mLastX - x;//mLast是拦截时 ACTION_DOWN 的值,向右滑动时为负数,向左滑动为正数
if (getScrollX() + scrolledX < mLeftBorder) { //左边界
scrollTo(mLeftBorder, 0);
return true;
} else if (getScrollX() + getWidth() + scrolledX > mRightBorder) {// 右边界
scrollTo(mRightBorder - getWidth(), 0);
return true;
}
scrollBy(scrolledX, 0);
mLastX = x;

break;
case MotionEvent.ACTION_UP:
//根据当前滚动值来判定哪个子控件的界面
int targetIndex = (getScrollX() + getWidth() / 2) / getWidth(); //滑动到屏幕的1/2进行切换
int dx = targetIndex * getWidth() - getScrollX();
mScroller.startScroll(getScrollX(), 0, dx, 0);
invalidate();//刷新
break;
}
return super.onTouchEvent(event);
}

@Override
public void computeScroll() {
if (mScroller.computeScrollOffset()) {
scrollTo(mScroller.getCurrX(), mScroller.getCurrY());
invalidate();
}
}
}

getScrollerX/Y

使用Scroller的过程中反复地使用到了getScrollerX()/getScrollerY()
下面我们以getScrollerY为例进行解释,getScrollerY获取的到底是什么值。

1
2
3
4
5
6
7
8
9
10
/**
* Return the scrolled top position of this view. This is the top edge of
* the displayed part of your view. You do not need to draw any pixels above
* it, since those are outside of the frame of your view on screen.
*
* @return The top edge of the displayed part of your view, in pixels.
*/
public final int getScrollY() {
return mScrollY;
}

源码中给了其中的解释,意思是 View顶部和显示界面的距离。下面我们通过一张图片更直观地理解到底getScrollY获取的是什么值。

当上滑时,超出屏幕的距离就是 getScroller的值,为正数
当下滑时,超出屏幕的距离也是 getScroller的值,为负数

那么Scroller.startScroll(0, getScrollerY(), 0, dy),这里 dy 起到的作用是什么呢?

通过这句代码,我们实现的操作是
getScrollerY+dy

假设 getScrollerY 值为 200, dy的值为200 ,执行这句代码后我们的变化如下:

注意
执行Scroller.startScroll(0, getScrollerY(), 0, dy)后要 调用invalidate进行刷新。

computeScroll()

这个函数的作用是什么呢?为什么要重写? 实际上它才是决定 我们调用Scroller.startScroll(0, getScrollerY(), 0, dy) 实现滑动的决定因素。

1
2
3
4
5
6
7
@Override
public void computeScroll() {
if (mScroller.computeScrollOffset()) {
scrollTo(0, mScroller.getCurrY());
invalidate();
}
}

注意这行代码,

1
scrollTo(0, mScroller.getCurrY());

mScroller.getCurrY 的值为前面我们计算的getScrollerY+dy 值。 scrollTo()表示移动到指定位置。 所以当我们使用Scroller.startScroll() 后会自动调用computeScroll() 来实现我们的滑动效果。

因此,我们在使用Scroller的时候要重写computeScroll(),在使用后一定要记得 invalid 进行重绘

自定义简单的下拉刷新组件

思路

初始化时,我们的屏幕显示的是 带颜色的这块内容。当我们向下滑动的时候显示头部内容,向上滑动时显示底部内容。

所以在自定的 SimpleRefreshLayout时,我们动态添加了头部和底部。

1
2
3
4
5
6
7
8
9
10
11
12
13
14
15
16
17
18
public SimpleRefreshLayout(Context context, AttributeSet attrs) {
super(context, attrs);
mHeader = LayoutInflater.from(context).inflate(R.layout.item_header_layout, null);
pullText = mHeader.findViewById(R.id.srl_tv_pull_down);
mFooter = LayoutInflater.from(context).inflate(R.layout.item_footer_layout, null);

mLayoutScroller = new Scroller(context);
}

@Override
protected void onFinishInflate() {
super.onFinishInflate();
RelativeLayout.LayoutParams params = new RelativeLayout.LayoutParams(LayoutParams.MATCH_PARENT, LayoutParams.MATCH_PARENT);
mHeader.setLayoutParams(params);
mFooter.setLayoutParams(params);
addView(mHeader);
addView(mFooter);
}

注意我们添加头部和顶部是在 onFinishInflate()这个函数中。
onFinishInflate()何时调用?为什么要用onFinishInflate()?

在我们使用View.inflate(context,R.layout.view_layout,null); View中的所有控件被映射成xml,在加载完成xml后,就会执行这个方法。也就是初始化布局后执行。

在此处使用OnFinishInflate() 是为了保证 头部和底部 布局已经被初始化后再添加到 SimplerRefreshLayout中。

测量

重写OnMeasure 来测量子类

1
2
3
4
5
6
7
8
9
@Override
protected void onMeasure(int widthMeasureSpec, int heightMeasureSpec) {
super.onMeasure(widthMeasureSpec, heightMeasureSpec);
//测量子类
for (int i = 0; i < getChildCount(); i++) {
View child = getChildAt(i);
measureChild(child, widthMeasureSpec, heightMeasureSpec);
}
}

布局

为了在初始状态只显示我们的 内容界面,
header的位置为 (0,-height,getWidth,0)
footer的位置为 (0,getHeight,getWidth, getHeight+height)

1
2
3
4
5
6
7
8
9
10
11
12
13
14
15
16
17
18
19
20
//布局
@Override
protected void onLayout(boolean changed, int l, int t, int r, int b) {
mLayoutContentHeight = 0;
for (int i = 0; i < getChildCount(); i++) {
View child = getChildAt(i);
if (child == mHeader) {
child.layout(0, 0 - child.getMeasuredHeight(), child.getMeasuredWidth(), 0);

} else if (child == mFooter) {
child.layout(0, mLayoutContentHeight, child.getMeasuredWidth(), child.getMeasuredHeight() + mLayoutContentHeight);

} else {//内容
child.layout(0, mLayoutContentHeight, child.getMeasuredWidth(), mLayoutContentHeight + child.getMeasuredHeight());
mLayoutContentHeight += child.getMeasuredHeight();

}
}

}

滑动

根据滑动的方向,我们来 切换滑动效果

1
int dy = mLastMoveY - y;

向下滑动时,dy < 0;
向上滑动时,dy > 0;
为了控制顶部最多只能滑动到头部高度的一半 我们使用了下面判断

1
2
3
if (Math.abs(getScrollY()) <= mHeader.getMeasuredHeight() / 2) {
scrollBy(0, dy);
}

我们还可以设置 有效距离effectiveScrollY,当未超过effectiveScrollY, 不显示头部,这个操作主要是在ACTION_UP做处理:

1
2
3
4
5
6
7
if (Math.abs(getScrollY()) >= effectiveScrollY) {
mLayoutScroller.startScroll(0, getScrollY(), 0, -getScrollY() - effectiveScrollY); //显示一部分头部
invalidate();
} else {
mLayoutScroller.startScroll(0, getScrollY(), 0, -getScrollY()); //回到原来位置
invalidate();
}

设置回调监听

1
2
3
4
5
6
7
8
9
public interface onRefreshListener {
void onRefresh();

void onBottomRefresh();
}

public void setRefreshListener(onRefreshListener listener) {
mRefreshListener = listener;
}

完整代码

1
2
3
4
5
6
7
8
9
10
11
12
13
14
15
16
17
18
19
20
21
22
23
24
25
26
27
28
29
30
31
32
33
34
35
36
37
38
39
40
41
42
43
44
45
46
47
48
49
50
51
52
53
54
55
56
57
58
59
60
61
62
63
64
65
66
67
68
69
70
71
72
73
74
75
76
77
78
79
80
81
82
83
84
85
86
87
88
89
90
91
92
93
94
95
96
97
98
99
100
101
102
103
104
105
106
107
108
109
110
111
112
113
114
115
116
117
118
119
120
121
122
123
124
125
126
127
128
129
130
131
132
133
134
135
136
137
138
139
140
141
142
143
144
public class SimpleRefreshLayout extends ViewGroup {
private View mHeader;
private View mFooter;
private TextView pullText;
private onRefreshListener mRefreshListener;
private int mLastMoveY;
private int effectiveScrollY = 100;
private Scroller mLayoutScroller;
private boolean isPullDown = false;
private int mLayoutContentHeight;


public SimpleRefreshLayout(Context context, AttributeSet attrs) {
super(context, attrs);
mHeader = LayoutInflater.from(context).inflate(R.layout.item_header_layout, null);
pullText = mHeader.findViewById(R.id.srl_tv_pull_down);
mFooter = LayoutInflater.from(context).inflate(R.layout.item_footer_layout, null);

mLayoutScroller = new Scroller(context);
}

@Override
protected void onFinishInflate() {
super.onFinishInflate();
RelativeLayout.LayoutParams params = new RelativeLayout.LayoutParams(LayoutParams.MATCH_PARENT, LayoutParams.MATCH_PARENT);
mHeader.setLayoutParams(params);
mFooter.setLayoutParams(params);
addView(mHeader);
addView(mFooter);
}


@Override
protected void onMeasure(int widthMeasureSpec, int heightMeasureSpec) {
super.onMeasure(widthMeasureSpec, heightMeasureSpec);
//测量子类
for (int i = 0; i < getChildCount(); i++) {
View child = getChildAt(i);
measureChild(child, widthMeasureSpec, heightMeasureSpec);
}
}


//布局
@Override
protected void onLayout(boolean changed, int l, int t, int r, int b) {
mLayoutContentHeight = 0;
for (int i = 0; i < getChildCount(); i++) {
View child = getChildAt(i);
if (child == mHeader) {
child.layout(0, 0 - child.getMeasuredHeight(), child.getMeasuredWidth(), 0);

} else if (child == mFooter) {
child.layout(0, mLayoutContentHeight, child.getMeasuredWidth(), child.getMeasuredHeight() + mLayoutContentHeight);

} else {//内容
child.layout(0, mLayoutContentHeight, child.getMeasuredWidth(), mLayoutContentHeight + child.getMeasuredHeight());
mLayoutContentHeight += child.getMeasuredHeight();

}
}

}

@Override
public boolean onTouchEvent(MotionEvent event) {
int y = (int) event.getY();
switch (event.getAction()) {
case MotionEvent.ACTION_DOWN:
mLastMoveY = y;
break;
case MotionEvent.ACTION_MOVE:
int dy = mLastMoveY - y;
if (dy < 0) {//下拉
isPullDown = true;
if (Math.abs(getScrollY()) <= mHeader.getMeasuredHeight() / 2) {
scrollBy(0, dy);
if (Math.abs(getScrollY()) >= effectiveScrollY) {
pullText.setText("松开刷新");
}
}
} else {//上滑
if (Math.abs(getScrollY()) + Math.abs(dy) < mFooter.getMeasuredHeight() / 2) {
scrollBy(0, dy);
isPullDown = false;
}
}

break;
case MotionEvent.ACTION_UP:

if (isPullDown) {
if (Math.abs(getScrollY()) >= effectiveScrollY) {
if (mRefreshListener != null) {
mRefreshListener.onRefresh();
}
mLayoutScroller.startScroll(0, getScrollY(), 0, -getScrollY() - effectiveScrollY);
invalidate();
} else {
mLayoutScroller.startScroll(0, getScrollY(), 0, -getScrollY());
invalidate();
}
} else {
if (Math.abs(getScrollY()) >= effectiveScrollY) {
if (mRefreshListener != null) {
mRefreshListener.onBottomRefresh();
}
mLayoutScroller.startScroll(0, getScrollY(), 0, -getScrollY() + effectiveScrollY);
invalidate();
} else {
mLayoutScroller.startScroll(0, getScrollY(), 0, -getScrollY());
invalidate();
}
}
break;
}
mLastMoveY = y;
return true;
}

@Override
public void computeScroll() {
super.computeScroll();
if (mLayoutScroller.computeScrollOffset()) {
scrollTo(0, mLayoutScroller.getCurrY());
}
invalidate();
}

public void stopRefresh() {
mLayoutScroller.startScroll(0, getScrollY(), 0, -getScrollY());
invalidate();
}

public interface onRefreshListener {
void onRefresh();

void onBottomRefresh();
}

public void setRefreshListener(onRefreshListener listener) {
mRefreshListener = listener;
}
}

头部布局item_header_layout

1
2
3
4
5
6
7
8
9
10
11
12
13
14
15
16
17
18
19
<?xml version="1.0" encoding="utf-8"?>
<RelativeLayout xmlns:android="http://schemas.android.com/apk/res/android"
android:layout_width="match_parent"
android:layout_height="match_parent"
android:paddingBottom="5dp">

<TextView
android:id="@+id/srl_tv_pull_down"
android:layout_width="wrap_content"
android:layout_height="@dimen/srl_pull_tv_height"
android:layout_alignParentBottom="true"
android:layout_centerHorizontal="true"
android:drawableLeft="@drawable/srl_arrow_down"
android:gravity="center_vertical"
android:text="@string/srl_keep_pull_down"
android:textColor="@color/srl_text_color"
android:textSize="@dimen/srl_text_size" />

</RelativeLayout>

底部布局item_footer_layout

1
2
3
4
5
6
7
8
9
10
11
12
13
14
15
16
17
18
19
20
21
22
23
24
25
26
27
28
<?xml version="1.0" encoding="utf-8"?>
<RelativeLayout xmlns:android="http://schemas.android.com/apk/res/android"
android:layout_width="match_parent"
android:layout_height="match_parent"
android:background="@color/srl_pull_background"
android:paddingTop="@dimen/srl_footer_padding_top">

<RelativeLayout
android:layout_centerHorizontal="true"
android:layout_width="wrap_content"
android:layout_height="wrap_content">

<ProgressBar
android:id="@+id/bottom_progress"
android:layout_width="30dp"
android:layout_height="30dp"
/>

<TextView
android:layout_width="wrap_content"
android:layout_height="wrap_content"
android:layout_centerHorizontal="true"
android:layout_toRightOf="@id/bottom_progress"
android:text="加载更多"
android:textSize="18sp" />
</RelativeLayout>

</RelativeLayout>

主布局activity_refresh_layout

1
2
3
4
5
6
7
8
9
10
11
12
13
<?xml version="1.0" encoding="utf-8"?>
<com.example.com.myapplication.view.SimpleRefreshLayout xmlns:android="http://schemas.android.com/apk/res/android"
android:id="@+id/refresh_layout"
android:layout_width="match_parent"
android:layout_height="match_parent">

<ImageView
android:id="@+id/image"
android:layout_width="match_parent"
android:layout_height="match_parent"
android:background="@drawable/f" />

</com.example.com.myapplication.view.SimpleRefreshLayout>

主代码

1
2
3
4
5
6
7
8
9
10
11
12
13
14
15
16
17
18
19
20
21
22
23
24
25
26
27
28
29
30
31
32
33
34
35
public class RefreshActivity extends AppCompatActivity {
private SimpleRefreshLayout simpleRefreshLayout;
private ImageView imageView;

private Handler mHandler = new Handler();

@Override
protected void onCreate(@Nullable Bundle savedInstanceState) {
super.onCreate(savedInstanceState);
setContentView(R.layout.activity_refresh_layout);
simpleRefreshLayout = findViewById(R.id.refresh_layout);
imageView = findViewById(R.id.image);
simpleRefreshLayout.setRefreshListener(new SimpleRefreshLayout.onRefreshListener() {
@Override
public void onRefresh() {
mHandler.postDelayed(new Runnable() {
@Override
public void run() {
simpleRefreshLayout.stopRefresh();
imageView.setBackgroundResource(R.drawable.d);
}
}, 2000);
}

@Override
public void onBottomRefresh() {
mHandler.postDelayed(new Runnable() {
@Override
public void run() {
simpleRefreshLayout.stopRefresh();
}
}, 2000);
}
});
}

本篇给出了自定义下拉刷新组件的思路,并给出了非常简单的小例子。实现的只是简单的 全屏图片时,下拉刷新上拉加载的效果。下一篇,我们将会 加入 嵌套布局时,滑动冲突判断,实现更加有意义的下拉刷新组件。

参考文章:
自定义下拉刷新组件

0%